Updated 1-27-17
Cash Register
Automatic reports
Afraid that your employees will forget to make a report before closing out the register for the night and then resetting the data? It is possible to set up "automatic reports" that will execute whenever the register is closed with option "2 Close register /print / erase / exit." You can even have the auto reports printed or saved to a file on the computer or transmitted by email or FTP over the internet to another computer.
To do this, from the main menu of the Cash Register program go to the "Reports" feature and press [F1] to read the instructions for this feature. If you have entered and activated a "master" password you will be required to enter it before you can see the instruction screen. If you then press [F1] again the program will return you to the Reports menu and you can start creating your automatic reports. As you create one report after another, including printing and saving the reports into a computer file, the program will save each key press into a "keystroke" file. When the Cash Register program is closed out it will look for this keystroke file and if it is found, it will return to the "Reports" feature and execute the keystroke file recreating the reports you are programming now, and then finish closing out the register.
While you are programming the automatic reports the program will not actually print or save the reports although it will allow you to set them up to do so. When you reach a point when you have told the program to print or save it will do nothing.
Automatic employee reports will make a report for every employee that has data, not any specific employee. This allows you to only program one employee report (for each type of employee report) instead of having to do so for each employee. The program does this by putting the "employee report" keystrokes into a loop. The maximum number of keystrokes in a loop is 100.
If you save automatic reports to a file they will use the following type of filename, example BT122306.TXT, where the first letter is the report type as selected in the "Reports" menu, the second letter tells you if the report is (T)ext or (D)ata, and the following 6 digits are the date in MMDDYY format. Automatic report files are appended to any existing report file with the same file name so if you close out the register several times in the same day the saved report will contain all of the reports from each close-out for that day.
Automatic reports saved to a file will be saved to a sub-folder with the same name as your register file. For example if your POS files are in the folder C:\POS and your register file name is KEYSHOP then the automatic report files will be saved in the folder C:\POS\KEYSHOP. If you are saving the file to another drive, like A:, then the files will be saved to the folder A:\KEYSHOP
When you have finished programming the creating/printing/saving of all the reports you want, and you are at the main "Reports" menu, press [F1] to save the keystroke file and return to the instruction screen. At this point you can press [ESC] to return to the main menu, [F4] to delete the keystroke file you just created, or [F3] to test your new reports.
If you choose to test your reports the keystroke file will be opened and one keystroke at a time will be read and executed. Press any key to read the next keystroke or hold a key down to auto-read keystrokes. When testing the file the program will actually print out and save your reports. When the last keystroke in the file has been executed you will be returned to the instruction screen.
When testing or actually using the automatic reports feature you will be warned to have plenty of paper in your printer and have the disk drives and other storage devices ready, i.e. stick a disk in them, plug in the RAM drive, etc.
On networked computers the only report than can made automatic on a LOCAL register is the "A. Total Sales" report. All other automatic reports must be programmed on the GLOBAL register. The keystroke file is LOCAL and must be programmed on each register.
The automatic "A. Total Sales" report is limited to the current values only, which will make it identical to the closing receipt. However unlike the closing receipt an "A. Total Sales" report can be saved as a file.
Any report saved by "Automatic Reports" (except Gift Cards) can be transmitted by email or FTP when the register is closed. This will require that your computer runs a version of Windows '95 or higher. You may select which reports to send and you may select to delete a report after it has been transmitted. If your registers are networked you can only transmit files from the GLOBAL register.
After you have setup the Automatic Reports you will be asked if you want to setup the program to transmit the reports. If you do, press [TAB]. On the following screen you must enter the data needed to transmit the files. (If you wish to later change your transmit settings enter Automatic Reports by pressing [F1] then exit by pressing [ESC].)
Enter the shop ID, which must be different for each shop sending data. If you want to email the files enter the email information. If you want to FTP the files enter the FTP information. Here is the list of parameters you will need.
SHOP ID
SENDER EMAIL
SENDER USERNAME
EMAIL PASSWORD
SMTP SERVER
RECEIVER EMAIL
FTP PORT
FTP USERNAME
FTP PASSWORD
FTP DIRECTORY
FTP SERVER |
The SENDER EMAIL address, SENDER USERNAME, EMAIL PASSWORD and SMTP SERVER are needed to log on to the email software. If you use "Outlook" you can find many of these parameters by starting Outlook (or Outlook Express) and clicking on the [Tools] tab. Then click [Accounts], select an account if you have more than one, then click [Properties]. Under the [General] tab you will find your email address and name. Under the [Servers] tab you will find your SMTP SERVER listed as "Outgoing mail (SMTP). The RECEIVER EMAIL address is where you want to send the email.
Likewise the FTP parameters are needed to send the files to the receiving computer by FTP. Since in each case the data required is dependent on the software on your computer and the receiving computer I cannot give you that information.
On the next screen select which files you want to transmit. Remember that if you did not setup Automatic Reports to create the file then do not select to transmit it. Note that a "D. Gift Card" report cannot be transmitted.
                                       TEXT FILE |DATA FILE
     SALES REPORTS                     SEND  DEL |SEND  DEL
        A. Total Sales                  [X]  [ ] | [ ]  [ ]
        B. Employee Sales               [ ]  [ ] | [ ]  [ ]
        C. Hourly Readings              [ ]  [ ] | [ ]  [ ]
        D. Gift Card                             |
     MERCHANDISE REPORTS                         |
        E. Total by Stock #             [ ]  [ ] | [ ]  [ ]
        F. Total by Category            [ ]  [ ] | [ ]  [ ]
        G. Total by Vendor              [ ]  [ ] | [ ]  [ ]
        H. Employee by Stock #          [ ]  [ ] | [ ]  [ ]
        I. Employee by Category         [ ]  [ ] | [ ]  [ ]
        J. Employee by Vendor           [ ]  [ ] | [ ]  [ ]
        K. History by Stock #           [ ]  [ ] | [ ]  [ ]
        L. History by Category          [ ]  [ ] | [ ]  [ ]
        M. History by Vendor            [ ]  [ ] | [ ]  [ ]
        N. Inventory by Stock #         [ ]  [ ] | [X]  [X]
        O. Inventory by Category        [ ]  [ ] | [ ]  [ ]
        P. Inventory by Vendor          [ ]  [ ] | [ ]  [ ]
        Q. Profit                       [ ]  [ ] | [ ]  [ ]
[TAB] = Toggle [X] [ESC] = Finished |
In the above example the "A. Total Sales" text report will be transmitted but not deleted and the "N. Inventory by Stock #" data report will be transmitted then deleted.
Remember that reports are stored in a sub-folder from the POS program folder. For example if your program folder is C:\POS and your register filename is KEYSHOP then the reports are stored in the C:\POS\KEYSHOP folder. Files to be transmitted will be copied to a C:\POS\SEND folder and anything in that folder will be transmitted. (So if you have a file of your own that you want transmitted for your own nefarious needs, stuff it in there before you close the register and it will make the trip.) After transmission the files in the \SEND will be moved to a sub-folder \SEND\BACKUP. It would be a very good idea to occasionally empty the SEND\BACKUP folder once you know that the files have been received.
So, does that mean all the original reports are deleted? Nope, they are still in the C:\POS\KEYSHOP folder. However if you use the above screen to mark the file for deletion then it will be deleted from the C:\POS\KEYSHOP folder also.
Even though the reports are appended every time you close the register on the same day the files will be transmitted each time the register is closed. However if you select to delete a report after it is transmitted the report will then not be appended if the register is closed out on the same day. For example if you close out the register 3 times in a day you will transmit the report 3 times. (The sequence number in the file name will be different but the rest of the filename will be the same.) If you did not delete the file after transmitting, the 1st report transmitted will only contain information from the 1st close out, the 2nd report will contain information from 1st and 2nd close outs, and the 3rd report will contain information from all 3 close outs. NOTE: The data is not added together, you will get 3 reports in the same file. However if you choose to delete the file then each report will contain information only from that close out. So the easiest solution is to close out the register only once a day or if you are running on a network close out the GLOBAL register only once a day. Remember that the GLOBAL register must be closed out last.
Of course a file can only be sent if you have setup "Automatic Reports" to create it and if your computer is connected to the internet.
If you enter email information the files will be emailed. If you enter FTP information the files will be sent by FTP. If you enter both email information and FTP information the files will be sent both ways. If you do not enter anything no files will be sent. (Actually the program only checks the RECEIVER EMAIL and the FTP SERVER NAME to determine if the files are to be transmitted.)
The file name of the transmitted files will have an added prefix consisting of a shop ID, a sequence number, and the date in YYYYMMDD order. For example if the shop ID is "21125" and the last file sent was "256" and the date is 3-25-2009 then the automatic report "DT052309.TXT" will be sent as "0002112525720090325DT052309.TXT" Leading zeros are added to make the shop ID eight characters long. Make sure all characters in the shop ID can be part of a filename. For example, no slashes. It is best to stick to letters and numbers in a store ID if you are not sure which characters cannot be used. Each file type will have it's own sequence. The sequence number will roll over from 999 to 000.
What you do when you receive the file is up to you. You can load the files into either a word processing or spreadsheet program and print it out if you wish. Or you can create your own software that will read from the files to automatically input into your accounting software or merchandise handling software. For example you can use an inventory report to generate shipments to restock your stores.
And where do you get this software? You will have to hire someone to do it. I have no idea what software you are using at your main office. Even if I did I have no access to it. To create the software to read the transmitted files and load the data into your accounting / merchandising / payroll / other software a programmer will have to study several transmitted files to learn how to get his software to read them. Then he will have to convert the data into a form that can be read by your accounting / merchandising / payroll / other software. To do this he will have to be familiar with your systems and have access to them. I cannot do from it here, sorry.
Here is some information about transmitted file names that your programmer can use.
                             11111111112222
                    12345678901234567890123
                            | |       |   |
SAMPLE FILE NAME 00128635274FD020409.TXT |
Characters 1 - 8 = Shop ID
Characters 9 - 11 = Sequence number. Every file has a different sequence.
Character 12 = Report type (See report list above.)
Character 13 = File type T= Text  D = Data (.CSV)
Characters 14 - 19 = Date in MMDDYY order.
Characters 20 - 23 = Always ".TXT" |
 Associates.
This function allows you to enter the names of the employees that are working in your store. If you have selected to track sales by employee then when you begin a sale you must choose one of the employee names from this list. If there are no names in this list then you cannot ring up a sale.
It is not a good idea to give your customers both the first and last name of your employees, there are a lot of nuts out there with phone books. Since the name entered here will be printed on each employee's receipts enter only a first name and possibly a last initial if you have two "Amy"s working in your store.
Please remember that this program does not really know who your employees are. The program only knows them as employee #1 or as employee #2 and then assigns a name to that employee from this list. The important thing about this is that employee data files are saved by the employee's number not the employee's name. This means that if Amy quits and then you assign her number to Donna, when you do a sales report for Donna, Amy's sales will be credited to Donna.
If possible do not reassign an employee number to a new employee until after you reset the merchandise file..
SETTING UP THE PROGRAM TO WORK IN RESTAURANTS
Restaurants have special needs that regular retail stores do not. In a restaurant you may want to keep track of employee tips paid at the register, run a "tab" until the customer is ready to leave, not have to enter stock numbers for the food you sell, transmit the food orders to the kitchen, etc. Setting up all of this uses settings from many different features of the program so I am going to consolidate all of them here.
RECEIPTS
To print receipts without stock numbers, tax rates, etc. on each line, in the "Printer setup" feature set "On 40 character wide receipts remove stock numbers and tax" to "YES."
TIPS
To track tips you must go to the "Employee setup" feature of the POSCONFG.EXE program and enter the employee names. Also select to use the employee list and to keep track of tips. Now when you total a sale by pressing [+] and just before the payment options are selected the program will ask you for the amount of the tip. Please note: the tip amount will go to the person ringing up the sale. This means that if one person waited on the customer, but a cashier is ringing up the sale, that the cashier must begin the >
sale by entering the employee number of the wait person, not her own number.
TABS
To have the register store orders until the customer is ready to pay go to the "Sale parking" feature of the POSCONFG.EXE and select the maximum number of tabs that can be parked, up to 255.
Now when you are at the screen where you can ring up a sale you may press [F6] to either park a sale or unpark a sale previously parked. Parked sales are given a 4 character identifier. It is up to you to come up with a system to identify parked sales. For example you can use the wait person's employee number and the table number (letter) and have an identifier of "05J"
Parked sales will stay in the parking lot until they are unparked. This is true even of there is a power failure or the register is closed out for the day. It is always a good idea to check the parking lot when you open the register in morning.
SALES CHECKS
To print sales checks that can be given to a customer at the end of the meal, so that he can pay the tab at either the table or bring the sales check to the register to pay, go to "Printer setup" feature of the POSCONFG.EXE and set "Print sales checks" to "YES"
Now when you press [+] to total the sale you will be asked if you want to print a sales check / return to sale, or print receipt / complete sale. If you select to print a sales check it will print. Then if you enabled sale parking the sale will park. You will now be returned to the sale. You may press [F5] to void the current sale to start another one.
ENTER ITEMS INTO A SALE
I am assuming that you want to enter all of your menu items into the stock table. This will allow you to have the description print on the receipt, look up the price of the item when ringing it up, keep track of your inventory, etc.
The problem lies in the fact that if you have this program setup as a retail store that you ring up items by their stock number. This is not convenient for a restaurant because it is really difficult to put a barcode label on scrambled eggs.
So how about if your menu is on the screen and all you have to do is pick the items from the screen? That sounds pretty good but it is going to take some work to get it done.
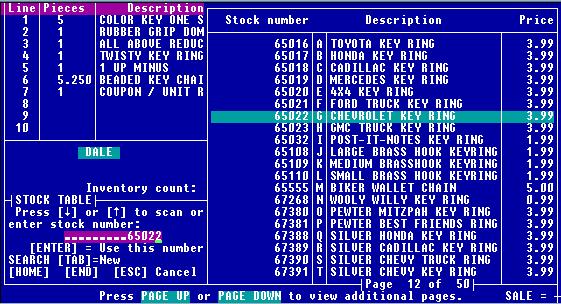
Screen shot of stock table during a sale.
The first challenge is to enter your menu into the stock table. To do this you must go to the "Stock table" feature of the POSCONFG.EXE program. There is a whole section of this manual about doing this and it is pointless to repeat it here. But before you go read the "Stock table" section of the manual continue reading this which will save you from doing it for a retail store and then having to do it over for a restaurant.
The stock table is basically a list of all the things you have for sale. For each item you can enter a stock number, description, price, and many other things. But now we are going to concern ourselves with just the stock number, description, price.
To a restaurant a stock number for each food item is pretty useless. However this program is designed to use a stock number for every item in the stock table. So you will be required to invent a stock number for each item in your menu. You can use any number you like and the only restriction is that every item has a different number. Since you probably do not care the simplest thing to do is to just use the line number as the stock number. For example line #1 has stock number 1, line #2 has stock number 2, etc.
If you are a snack bar, hot dog stand, etc. and you have a small number of items, say 40 or less, then you can just enter your menu into the stock table on the first 40 lines.
However if you have dozens or hundreds of items then you will want to organize your menu into "groups." Groups are things like Beverages, Breakfasts, Sandwiches, From the Grill, or anything you want. You may divide your menu into up to 20 groups. There is no limit on the items in a group as long as the total number of items in all groups is less than 26,000. But it is best to have more groups with fewer items in each group.
Let's talk about what should be in your stock table. First of all every item in your menu should be there. If one item has options then each option must be in the stock table. For example if you sell Cokes then Coke large, Coke medium, Coke small, should all be in the stock table. You will also need to enter things that have an extra charge like if tomatoes on a sandwich will be 50� more.
When you take the customer's order, if you are going to hand write the order and carry it to the kitchen, that should be enough. However if you are going to enter the order into the register then either print out the order for the kitchen or use the KITCHEN.EXE program to transmit the order to the kitchen then you will need to do more.
Remember that on a printed / transmitted order to the kitchen you cannot write anything. This means that all options must be in the stock table. Will you sell steak? Will it be rare, medium, or well? Will the steak have mushrooms or onions added? Will a salad have French, Italian, Thousand island, Caesar, or other dressing? Will the dressing be on the side? So a sample group for Steaks may look like this in the stock table�
STOCK NUMBER DESCRIPTION    TAX PRICE
         161 T-BONE          1  18.95
         162 SERLOIN         1  16.95
         163 NEW YORK STRIP  1  14.95
         163 SALSBURY        1  12.95
         164    RARE         0   0.00
         165    MEDIUM RARE  0   0.00
         166    MEDIUM       0   0.00
         167    MEDIUM WELL  0   0.00
         168    WELL DONE    0   0.00
         169    MUSROOMS     1   1.50
170 ONIONS 1 0.75 |
Note the descriptions of the modifiers have been indented. Now you can send this to the kitchen�.
161 T-BONE           1  18.95
166    MEDIUM        0   0.00
169    MUSROOMS      1   1.50
203    MASHED POTATO 0   0.00
225    EX. BUTTER    0   0.00
189    CORN ON COB   0   0.00
 89 TOSSED SALAD     1   4.00
 95    FRENCH        0   0.00
 65    ON THE SIDE   0   0.00
163 NEW YORK STRIP   1  14.95
165    MEDIUM RARE   0   0.00
169    MUSROOMS      1   1.50
170    ONIONS        1   0.75
 73 CAESAR SALAD     1   4.50
206    BAKED POTATO  0   0.00
192 MIX VEGATABLE 0 0.00 |
and there will be no confusion over the order. Just remember that the maximum number of lines in one order is 60 lines.
It is possible that some modifiers may be shared by different groups. For example you can put tomatoes on cold sandwiches or hot dogs / polish. You may either put the same modifiers in multiple groups or have a separate group with just modifiers in it.
Now you need to layout how you will place the different groups in the stock table. Each group must occupy a section of the stock table that is a multiple of 20 lines. For example the first group can be in the first 20, 40, 60, etc. lines. The next group can take the next 20, 40, 60, etc. lines. Groups do not have to be the same size. You can have a group of 40 followed by a group of 20 followed by a group of 60. You can have blank lines in a group to fill out the group.
The first line of each group must be a multiple of 20 plus 1. So you can begin entering a group on lines 1, 21, 41, 61, 81, 101, 121, etc. When you display the stock table from the sales screen this will allow the first item in the group to be at the top of the screen. It is a good idea to write down the name of each group and the line it starts on.
When entering the items in the stock table there is also another column labeled Category. An item's category is totally independent from what group it is in. There can be 254 different categories. So for example you can have a Group of "Dinner entrees" and they can be further divided into categories of steaks, chicken. pork, etc. But the important thing about categories is that if you are going to be using the KITCHEN.EXE program to transmit order to the kitchen it will only transmit the items from the categories you set.
For example you can go to the "Kitchen" feature of the POSCONFG.EXE program and set it up to send only items sold from categories 5 - 35 to the kitchen. This means that food items are transmitted to the kitchen because they are in categories 5 - 35 but drinks from categories 1 - 4 and souvenirs from categories 36 - 50 will not be transmitted.
So it is a good idea to enter your different categories into the "Category list" feature of the POSCONFG.EXE program before you begin entering the actual items into the stock table. Do not enter anything into category #0. You can skip lines in the category list. For example you can have food from categories 1- 22, then blank categories from 23 to 50, then other stuff from 51 on. If you enter 1 - 50 into the "Kitchen" feature of the POSCONFG.EXE program then you will have room to add additional categories of food later.
Another good idea is before you begin entering items into the stock table to enter your different tax rates into the "Tax rates" feature of the POSCONFG.EXE program.
NOW IS A GOOD TIME TO READ THE "STOCK TABLE" PART OF THIS MANUAL AND ENTER YOUR ITEMS INTO THE STOCK TABLE.
Welcome back.
There are two things left to do before you can start ringing sales. Go to the "Scanner" feature of the POSCONFG.EXE program and set it to "All are scanned." (Do this even though you do not have a scanner.)This will allow you to enter an item into a sale by sometimes pressing only one key. If you want two of the same item in the sale press the same key twice. NOTE: If you do this, to enter an item and be able to change the price and quantity (which you will almost never have to do) you then press [ESC] until the menus clear and you can see the main sale screen. Now type in the stock number and press [F8] (not [ENTER] ) and you will be able to type in a price and quantity for that item. Now press [F1] if you have to return to the menus.
Now go to where you can enter items into the stock table and press [F6] to bring up the "Groups" screen. If you are not dividing your stock table into groups (you have less that 40 items in your menu) then you do not have to enter anything into the list. Otherwise enter the name of each group you have and the start line for that group.
Now you have to decide what method you want to use to enter items into a sale.
If you choose "[F6] Do not use groups" then when you enter the sales screen in the POS.EXE program you will see the normal sales screen. If you press [F1] you will see the stock table from the beginning. (20 items per page, use [PG UP] and [PG DN] to view other pages.) After you select an item you will return to the normal sales screen.
If you choose "[F6] Use groups as an option" then when you enter the sales screen you will see the normal sales screen. If you press [F1] you will see the list of all the groups. When you select a group you will then see a list of all the items in that group. After you choose the item you want you will be returned to the regular sales screen.
If you choose "[F7] Group default, menu default" then when you enter the sales screen in the POS.EXE program you will see list of all the groups. When you select a group you will then see a list of all the items in that group. After you choose the item you want you will stay on that page to choose other items. To return to the "Groups" page press [ESC].
If you choose "[F8] Use groups as the default" then when you enter the sales screen you will see list of all the groups. When you select a group you will then see a list of all the items in that group. After you choose the item you want you will return to the "Groups" page.
If you choose "[F9] Use stock table as the default" then when you enter the sales screen you will see the stock table from the beginning. After you select an item you will stay in the stock table.
For restaurants that use "groups" the options [F7] or [F8] are best. If you have less than 40 items and do not use groups then option [F9] is best.
To return to the normal sales screen to use the functions that are there (discount, void, park, coupons, etc.) press [ESC] until you are there. From any screen press [+] to total the sale.
If you are in the normal sales screen and want to return to the groups or menu press "[F1] Stock table."
To choose a group from the group list you may either use the arrow keys to scroll to the one you want and press [ENTER] or you will notice that the 20 groups are lettered [A] to [T], just press the letter. From the menu screen you can use the same two methods or type in the stock number and press [ENTER].
If you use either the group methods [F7] or [F9] then after selecting an item from the menu the item will remain highlighted, to sell another of the same item just press [ENTER] or the letter key for that line.
KITCHEN PROGRAM
As pointed out above the KITCHEN.EXE program will transmit the food orders from the register to the kitchen. Go to the "Kitchen" section of this manual to learn all about it.
Previous page | Table of contents | Next page
CASH REGISTER HOME