|
64 bit computer or 64 bit Windows?
|
|
If your computer is running a 64 bit version of Windows XP, Vista, 7, 8, or 10 this POS program will not automatically run on your computer. However by installing DOSBox (another FREE program) you will not only be able to run my Cash Register program but also many other 16 and 32 bit programs that your computer currently cannot. Also for those folks that absolutely, positively require that my Cash Register program must run in FULL SCREEN (instead of a large window) DOSBox will also do that on 32 bit computers that have a problem with running my program full screen. First you must properly download the Cash Register program using these instructions upgrade.htm Since DOS software will not run on your computer you will have to run a 32 bit program on your computer that will run DOS software. This program is called DOSBox and can be obtained for free from here http://www.dosbox.com. You will find instructions there on how to download the program and start it up. I will wait here until you do so. Now that you have the Cash Register program on your computer and you are running DOSBox we can get started. First you must tell DOSBox where the Cash Register program is located. Assuming that the Cash Register program is located on a folder named C:\POS type this into the DOSBox window (Press [ENTER] after each command)
Now this
Now this
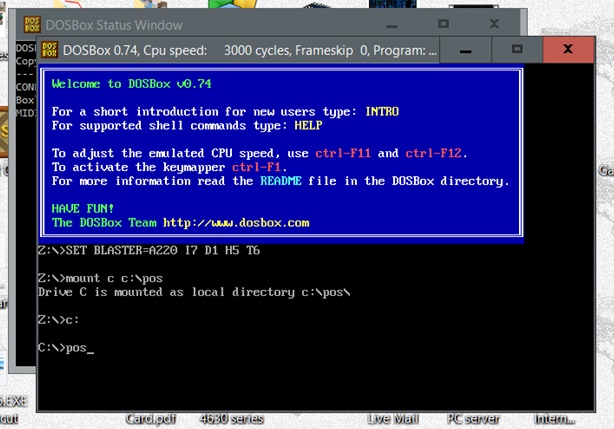 MOUNTING in DOSBox. The Cash Register program will now start. However during the starting process while going from screen to screen the program will sometimes stall for up to 15 seconds, wait it out. The stall only happens when the program starts or when you are switching from one program file to another. This stall does not happen when you are using the Cash Register program on a non-64 bit computer without DOSBox. By holding down [ALT] and pressing [ENTER] you can toggle between displaying the program in a window or full screen. If you exit the program when it is run full screen press [ALT] + [ENTER] then click the [X] on the top, right corner of the window to close DOSBox or from full screen type EXIT and press [ENTER]
AUTOSTART You can automate the start of the Cash Register program when you start the DOSBox software. Using the Windows "My Computer" program (or "Computer", or "This PC") locate the file...
In the path above replace ???? with the version number you have of DOSBox, example...
In later versions of Windows this path may be inaccurate. My DOSBox-0.74.conf file is actually located at so you may want to use the Windows search / find / locate feature to find yours. Or if you are really cool use the "Command Prompt" command DIR DOSBOX*.CONF /S Note: The very best program to use to edit the DOSBox-0.74.conf file is Notepad. Other word processing programs (especially MS Word) will insist on either adding formatting characters to the text or renaming the file like DOSBox-0.74.conf.txt. Then when loading DOSBox either the the POS program will not autoload or DOSBox will shut down. Notepad does not give a crap, it will not add formatting and will not rename the file. To load the DOSBox-0.74.conf file start Notepad and click on [File] then [Open]. Then in the address box at the top enter the address C:\Users\Dale\AppData\Local\DOSBox and press [ENTER]. Of course you will have to replace "Dale" with your username. Now in the lower left corner of Notepad above the [Cancel} button press the down arrow and choose "All files (*.*)" and the DOSBox-0.74.conf will appear. Double click on the DOSBox-0.74.conf to load it, edit it, save it.
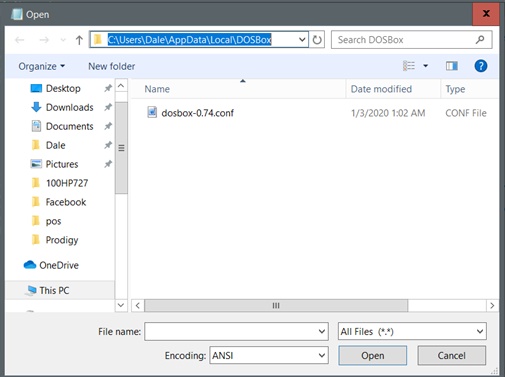 Notepad open window.
[autoexec]
Mount c c:\pos Note: the last line is the command to start the POS program. If you have the program files located somewhere else than C:\POS then type in the correct PATH on the "mount" line but do not change the last line. If you wish the POS program to start up in full screen, in the .CONF file find and change the following line... FULLSCREEN While as mentioned above when DOSBox is running the POS program then anytime you hold down [ALT] and press [ENTER] you will toggle the display between full screen and a window. However you can get the POS program to start up in full screen by finding the "fullscreen" text in the DOSBox-0.74.conf file and making this change... fullscreen=false to fullscreen=true Save the file as a plain text file. Now when you launch the DOSBox software it will automatically run the Cash Register program. DOSSHELL Another autostart option is DOSShell. This will create a folder that can hold multiple programs that you wish to run under DOSBox. Then all you have to do is to click on the DOSShell icon, then the icon of the program you wish to run. Of course you will need to have previously installed DOSBox on your computer.
To enter a program into DOSShell start DOSShell then click on [Edit] followed by "Add new entry...". Enter the [Name:] you want to call the program such as "Dale's most wonderful Cash Register program" (or you may want to use something shorter.) Now enter a [Group:]. Now you must enter a complete [Path to Executible:] This must be a complete path including the full name of the program file like C:\POSFOLDER\POS.EXE If you have additional programs that require DOSBox you can also add them to the DOSShell folder.
PRINTING
If you are using a parallel port printer and you do not have the printer driver for that printer you will have to install the "Generic" driver from Windows. From the Windows [Start] button go to [Settings] then [Control panel]. Click on the [Printers & Faxes] icon. When the window opens from the menu bar click on [File] then [Add printer]. Follow the prompts until a list of Manufacturers and Printers appears. Select the "Generic" manufacturer and the "Generic / Text only" printer. Click [Next] and follow the prompts until the driver is installed. NOTE: There are problems with using the generic printer driver. See Generic printer driver problems.
AFTER you have installed either the printer's driver or the generic driver then start the APRINT6 program. Select the proper driver and font size which you only have to do the first time you start APRINT. Remember that APRINT6 must always be started before the Cash Register program and be left running while the Cash Register is running.
CASH DRAWERS
However SERIAL CASH DRAWERS WILL NOT FUNCTION.
SCANNERS
However SERIAL SCANNERS WILL NOT FUNCTION.
POLE DISPLAYS
A better and cheaper option for a pole display is here.
NETWORKS
First, make a directory on the computer you wish to be running as your server. Using a directory on the root of the drive is recommended. For example, I'm going to set up a "POS" folder inside of my C: Drive.
Inside that C:\POS folder, make another folder called POS.
Inside the C:\POS\POS folder, make yet another folder called POS. No, I'm not kidding, you have to make 3 folders, one inside of the next. The reason being, because DOSBox has to have a directory to use, then the share has to have a directory, and then DPOS has to have a directory. It may sound weird right now, but it will work, trust me.
Inside the final POS folder, C:\POS\POS\POS, extract the POS program files, and set it up how you normally would for a network server. Configure all your settings, etc.
Then, set up a network share to share the main POS folder, the C:\POS folder. Set the network share up so that you can change files, if you are using an XP professional computer, set permissions accordingly. For the purpose of this demonstration, I will name my network share "POS"
On the Remote computer running a 64 bit OS, map the network drive of the computer. So, since my computer's name is "THECOMPUTER", I will go to start, run, then type \\thecomputer. Wait a moment for windows to bring up the networked computer's drives/printers. If it askes for a username/password, you probably have XP Pro on the server computer. Not to worry, just type in the username/password that you usually use to login to the computer. After that comes up, you should see an icon that looks similar to the folder, which is named whatever you named your network share. Since I named my network share POS, My icon will be labeled POS.
Next, right click on the folder, and click on "Map network drive". Choose a drive letter, for mine, I'm going to choose J:. Go thorough the rest of the wizard and just keep clicking next.
In DOSBox, when it first starts, type the following
Type "POSCONFG.exe"
It will take you to the POS Configuration screen. Note that it is posCONFG, not POSConfig. I made this mistake a few times.
Under network, set the path to "J:\POS" assuming that you mapped your network drive to J.
Save, then press F1 to exit. Press 3 to start the POS program.
After all that work, POS should finally work over a network. If it's not working, you probably screwed something up. In which case, don't be afraid to ask for help. Don't try to "Fix" it and end up screwing it up even more.
That is all, |